Monday, December 19, 2011

I'm Baaaaaaaaaaaaaaaack!

Been busy? Me, too! So much to share, so little time. My biggest obstacle to posting is getting pictures uploaded to my computer. I need a better way.

Little Forest Quilt Along Update
I actually finished the week after Thanksgiving. Hanging it is another matter. Have I mentioned we have one - ONE - item hanging on our dining room walls and NOTHING on our living room and bedroom walls? At least the one picture we have is of Christ. That says something, eh? So, here it is:

Since it's not hanging yet, I photographed it on my table. Light is bad, sorry. Also, the different shades of off-white don't show up this much in real life. And in retrospect, I would totally move that last tree in the last row to the left one space.

Remember in an earlier blog when I said I was going for a vintage "this hung on my grandma's wall" look? And partway through I got nervous that it would look like grandma smoked two packs of Virginia Slims' a day? No worries... It totally looks like how I orginially envisioned. I love it! A reminder that I didn't use much red because it will be hanging on a red wall.

There are lots of imperfections, specifically, the corners do not line up. But I don't care. It's the rustic look I love. I have to tell you, though; it made stitching in the ditch quite the challenge.

Here's a close-up of that corner issue. Also, it resulted in some trees being too close to the binding (as shown here) but I didn't think of that as I was assembling the trees.


Another reminder: donated fabric! That's probably what I love most about it. It reminds me of friends and family. Can't think of a better reminder during the Christmas season.

Here's my favorite tree. I love this little plaid fella'!


And this one, too. This was the perfect background for a winter season piece. Reminds me of snow. I want to do a table runner (square, really) using this background only and red and green trees. Sort of do a boarder of trees all the way around and a big blank in the middle (of this fabric).

I'm really happy with this piece and so grateful to Mama Pea and Linda for hosting this QAL. Fun, fun, fun. And I finished! Woot!

Saturday, November 12, 2011

Smooky

She says 'smooky' instead of spooky.

And 'remokacontrol' instead of 'remote control.'


How stinkin' cute is that?


I hope she nevers says them right.

What cute mispronunciations did your kid(s) say?

Thursday, October 27, 2011

Halloween-themed Table Toppers

Ta - da! I finished them. Well, the 2 for my friends are done. I gave this one to Debi, who is teaching BonnieBlue to ride. The flowers are from Rhett, a 'congrats' gift for getting through my first 3 promotion & tenure (P&T) hurdles: a nearly unanimous vote from my campus faculty, exactly the 2/3 majority needed from my department/school faculty, and a recommendation for P&T from my school director to the college dean. Fingers crossed that the dean promotes and tenures me.


Here's the back. Disappearing nine-patch. It was going to be the front until I thought fussy cutting the witch and bordering it with the cats would be adorable, hence making a more attractive front. It does, don't you think?


I gave this one to my friend, pseudonym Mellie, with whom I work. BonnieBlue's hand is for perspective on size.

 I didn't think far enough ahead to fussy cut the witch in the direction that the bat fabric would run. Or vice-versa. I still like it. Here it is on her table, with the other side up. Simple.

I feel so accomplished.

Now, I've got to bind mine, and sandwich, quilt, and bind my Little Forest wall hanging. Maybe tonight while watching tv....

Monday, October 24, 2011

Halloween Sewing Project

Here's a tease re: what I've been working on that has been keeping me from finishing the Little Forest QAL.


I've made 3 of these, one for me and 2 for friends. These two are for friends and are SO much cuter than my own. As it should be, I guess.

Since Halloween is in exactly one week, I hope to post the finished items by the end of the week.

Friday, October 21, 2011

Making Progress on the Little Forest Quilt Along

I've got all the rows sewn together on my Little Forest wallhanging quilt.


The backgrounds that look white in this picture do not look that white in real life.

I was going for an old-fashioned look/feel to this quilt, hence the off-white background, but to be honest, when I finished sewing all the rows together and looked at it with a fresh eye, it reminded me of the color that the once-white walls in my house growing up ended up being 10 or so years after my chain-smoking stepmom moved in. I'm trying to emotionally work past that, but it's hard. Hopefully once it's quilted, backed, and bound, I won't think about it that way anymore.

Now the indecision begins. I have a lovely green woodsy fabric that I've been thinking would make a great backing. BTW, I'm avoiding red because the wall this will be hanging on is red. But I also have several cute/interesting Christmas fabrics that I've been accumulating to make a Christmas quilt, many of which would be cute as backing, but on a wallhanging, no one is going to see the backing! So, indecision is rendering me, well, indecisive.

What's more, I'm  not what you'd call an accurate quilter. My corners don't AT ALL match up. So I'm struggling with how to quilt this. The original is stitch-in-the-ditch, I think, which is not an option when the points are off. I absolutely LOVE how Alamosa Quilter pebble-quilted her background, but I don't know if I can pull that off without taking a LONG time to do it. I noticed that some of the other Little Forest Quilt A-long-ers meandered, so I might do that, given it's my strong suit.

According to the Little Forest Quilt Along assignments, I'm way behind. I'm supposed to be finished by now. Frankly, if it gets done before Thanksgiving, nay, Christmas, I'll be impressed with myself.

I've said this before but it's worth mentioning again. For some reason, Blogger doesn't let me comment on my own posts, so when someone is thoughtful enough to comment on one of my posts, I can't comment back. But please know, I read the comments and really, really appreciate them!

Tuesday, October 18, 2011

Save your Ta-Tas!


October is breast cancer awareness month, so I just wanted to remind you to squeeze your boobies. Doesn't matter where (well okay, maybe it does matter where), just do it. Once a month I(try to remember to) self-exam in the shower, but interestingly, when I found my own tumor, I was laying flat on my back dealing with insomnia due to my nervousness about my doctoral program admission interview the next day. So, go figure, I'm a big proponet of self-exams.

October is also my end-of-treatment anniversary month. I found my lump in April, had it removed in June, had chemo June, July, & August, and radiation in September and part of October. I was on Tamoxifen for a few years after that, but I recognize October as the "it's over" anniversay. This year, I celebrate "nine years out." That's how we say it, in breast cancer survivor lingo.

If you're a guy, or know a guy, tell him to self-exam, too. Although less than 1% of all breast cancers occur in men, they have a lower survival rate.

There are obviously many drawbacks to breast cancer (death potentially being the big one, of course), but there were a lot of benefits for me. I'd like to share them, as my own little way of counting my blessings.

1. It brought Rhett and me together. We were in the throes of infertility treatment when I was diagnosed, and if you know anything about that, it can just kill the intimacy in a marriage. And sometimes the marriage. It causes tension in some marriages, as it did in ours. Incredible, unbearable tension. We were teetering on the edge. The diagnosis gave us something to rally together against, unlike how we dealt with infertility. I will always be greatful for breast cancer. It saved my marriage.

2. It made me realize how utterly unimportant hair is. If it were socially acceptable, I would totally shave my head and be bald. Okay, I'd have to weigh 30 fewer pounds, too, but still, I'd do it.

3. Chemo makes your skin absolutely glow. For months after, even. This was taken about a month after I finished my last chemo treatment.

 See what I mean about the shaved head? Here, my hair had already started to grow back in, but I loved it like this! And then when it got curly, most excellent! Eventually it straightened out, though, and became my regular, boring, unappealing hair, only melanin-less (read: grey).

By the way, I cropped Rhett out because he'd want it that way. He hates having any kind of "presence" on the Internet (hence the pseudonyms).

And finally,
4. It made me value the truly important. My husband. My (and his) family. And all the blessings of the gospel. Truth be told, when I was diagnosed, I was pretty certain I was going to die (and the doctors seemed to think so), but I was okay with it. In fact, I was confident all would be well. I'd be joining those who went before (my mom, most importantly) and be in a most wonderful, excellent place. I was ready. That's a special kind of emotional/mental place to be. Now, I wouldn't be. I've got BonnieBlue now, and that alone would make me sad to die.

This is probably repetitious from some other blog entry, so I'll end there with the reminder to self-exam so that you, too, can


Sunday, October 2, 2011

Kid's Art Folder Tutorial

My child started pre-k this year and is already bringing home scads of paper: art, worksheets, etc. I have a tupperware container for a lot of her mementos (e.g., a rosary her birthmother gave, her birth bracelet from the hospital, the cap she wore in the hospital, a diaper to show how small she was, one of my favorite onesies, etc.), but I didn't want to put her school papers/art in it. I know that saving her artwork/schoolwork could easily get out of hand, but she does make some cute stuff, so I wanted a cute way to save the best of it. A box just wasn't going to do it, because I wanted to organize it by year, too.

My friend, Stephanie, posted this link on either her FB page or her blog, I can't remember which. It's a video clip from Charlotte, Today, an NBC affiliate's morning show, about "Displaying Your Kid's Artwork." This clip features a woman who shares some simple ways to create "holders" for your children's artwork. Her name is Donna Downey from Donna Downey Studios. I linked to her website, but I didn't spend any time to see if this project is there.

Two of the methods she shows are for saving and storing your child's artwork, and one is a quilt you make with a special kind of fabric transfer. That seemed interesting, but that was the 'display' advertised in the segment link, and I wanted a storage method. I was intrigued with her simple method of making a folder out of manila envelopes, cardboard, wrapping paper, duck tape, and a rubber band. Before I write anything else, you should watch the clip, because I'm going to critique it and tell/show you how to make a better one. Not with a mean-spirited intent, mind you; just from a practical point of view. But to whet your appetite, here's a pic of my finished product with BonnieBlue's real name 'rubbed' out.


Okay, first, the critique of the video. She used a rubber band tied around a pencial to bind the folder. Unfortunately, that rubber band is going to deteriorate within about a year, and it will break, so that's not a good way to 'bind' the folder. I thought of a few things, including 2-inch brass fasteners, which I may try for the next one I make as a gift for a friend. But for this, I settled on buttons and embroidery floss.

Next, the clasps on the envelopes are going to wear out in absolutely no time. I find that after the 3rd time I open one of those envelopes, the little metal tabs fall off. So, another way to fasten the folders was going to be necessary. Some manila envelopes have the wrap-a-string-around-two-brads method of 'securing' closed the envelope, but the envelopes I have are pull-stick strips of adhesive. I do, however, have in my stash the scrapbook alternative to the wrap-a-string-around-two-brads.


I guess they're not the alternative; they are wrap-a-string-around-two-brads brads.

Third, why the manila? There are white ones available, and I happened to have them on hand, so that option would be better, both financially and asthetically. Unfortunately, I wanted the larger size because some of BonnieBlue's artwork isn't the standard 8.5"x11" size. I wanted the 13" x 10" envelopes. I bought mine at Staples for $5.99 for 12; not bad as that's enough to make two of these storage folders.

Speaking (writing) of money, I'll do a cost break-down of mine at the end.

Okay, so here's the tute:

Materials, though this isn't everything. Missing is an exacto knife, a small-holed hole punch, large needle, thick white embroidery floss, letters, and chipboard decoration or some other decoration:

First, get/cut some cardboard. Donna, in the clip, says "Use garbage," or something like that. I'd like to stress here that perhaps you don't want to use, say, the pizza box from dinner last night. If this is going to be sitting around the house, you don't want it to have had food on it.  What I actually used: Rhett and I recently bought a king-size bedcover at Costco and it had two cardboard inserts that were perfect for this project. Here are some other options I had lying around the house: First, I have several of those jumbo poster-sized sticky note pads at work. I used one up recently and brought the empty back home. It is easy enough to cut with an exacto knife. Another option is a copy box. Next option: A large shoe box. The added bonus of this is that the lid lip is perfect for that binding piece.


Measure and cut cardboard 2 pieces of cardboard that are just a tad larger than your envelopes. Then cut a 1-inch (approx) strip from each piece.
To avoid any confusion on your part, I cut these after I completed my daughter's folder. I'm going to make another for a friend using smaller envelopes, hence these pieces of cardboard measure about 13 inches long, including the one-inch binding strip. The cardboard for my  finished folder measured 15" x 10.5", including the one-inch strip.

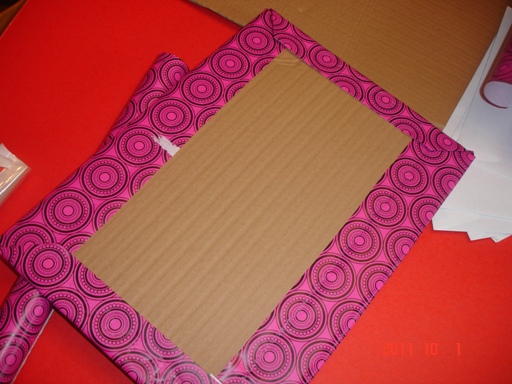
Next, wrap the cardboard pieces all separately in wrapping paper. I can't remember if Donna wrapped the strip with the bigger piece, but I didn't.
I bought the wrapping paper at Target for a $1.00. It's the lightweight stuff, which worries me as far as durability. I have some brown-paper-bag-like sturdier paper that I might try for another (as a gift!). The tape I had (and really wanted to use) wouldn't work with it, though, for BonnieBlue's folder. That tape mark on the left side of the board isn't going to matter. Take a large piece of coordinating scrapbook paper, cut it down to fit and tape over this inside of the board. I didn't take a picture of this step but you can see my choice in the open book view later. It's a blush pink page with a rough drawing of a crown and a "P" for princess.

And here's a thought (pay attention Mama Pea): It would be really cool to use fabric to cover this. Again, I think I might try to make another one using some of the cute stuff in my fabric stash. If you use fabric, and aren't too worried about sewing through cardboard, that's how you could bind it!

After all 4 pieces are wrapped, you're going to join the strips to the larger pieces (making the binding) using the duck tape. It comes in great colors and patterns now, making it fun to choose and coordinate. Place the one-inch cardboard strip next to the larger piece and tape all the way around. Unfortunately, I didn't wrap all the way around, so the inside looks a bit unfinished, as you can see in the open book view later.

I used zebra print duck tape because BonnieBlue loves zebras. I didn't like the look of the edge uncovered by tape, so I added another strip next to and over the end.

Since I'm going to use buttons and floss to hold the binding (I used 3, not just the 2 pictured), I need to measure and score where the needle is going to through the cardboard and envelopes.


This picture shows how big the buttons are, not how I measured the envelopes.

I measured one envelope on the sealed end, marking the halfway point and then marked each of the halves at those halfway points. I made 2 dots on either side of each half mark to coincide with 2 of the holes in each button.  (Sorry, again, I forgot a picture.) I then used a hole-punch with a tiny hole and punched through the dots. I'll be honest; I wasn't all that concerned about being exact with the measurements. I simply didn't care if the buttons weren't spaced perfectly. This pic should give you an idea.

This shows part of one envelope with the holees punched at the end that will be bound. (And by the way, that's the crown on the end paper I used on the inside of the cardboard.) I laid that envelope over another one and used a marker to dot the place where I will punch holes on that one. I then repeated the process on the other 4 envelopes. I'm using 6 envelopes, one for each of the first 4 grades, kindergarten, and pre-k.  I then punched the holes in all the envelopes.

Now I have to make sure that the envelope holes line up with the holes I'm going to punch through the cardboard, so I placed one of the envelopes where I wanted them all to line up on the cardboard and used my needle to score the cardboard.
After scoring all the holes in the cardboard, I moved the envelope and punched the holes all the way through using the needle.  I put all the envelopes inside the two pieces of cardboard, making a sandwich of everything. I then threaded the needle, placed it through the  first button, and forced the needle all the way through, being careful not to pull the end of the floss all the way through.

I had to keep loosening and tightening the sandwich to get it back through on the coming-back-through-the-other-way trip for the needle. You want the two floss ends to be on the top side of the cardboard after attaching the first button.
Tie the floss in a knot. Repeat the process for all three buttons.

I probably could have used smaller buttons, but I really like the large ones. I ended up with them just a hair over the edge, but I wanted to err on the side of being able to open the binding with no problems.

I used some nice letters to put the name on the front, 'pre-k' on the first envelope, 'k' on the next, etc. As you can see, there is plenty of room for her grade-level picture each year.
You can see here where the the inside looks unfinished because I didn't wrap the tape all the way around. Because my child loves horses, I glued one to the front. I'm thinking about putting one on the pre-k envelope and then adding some kind of graphic of whatever she's into that year on each envelope. I have a crappy memory, so that will help me out a lot. There is also room to write things like teacher's name, best friend, interesting events, etc.

Here's an open book view (before I put the letters on the envelopes):


And now the cost break-down:
1. cardboard - free, already had
2. envelopes - $6 (but I did have 6 smaller ones I could have used for free)
3. wrapping paper $1 (but I could have used what I had)
4. duck tape - $4
5. buttons - $2 but I have a bunch that I could have used
6. scrapbook paper brads- free, already had

7. glue & tape - free, already had

8. sticky letters - free, already had

9. needle and floss - free, already had (you could use twine, any heavy thread, etc.)

Total cost is $13 (could have been done with just $4 for the tape!), but I'll be able to make at least 2 more for gifts with the items I chose to purchase in combination with what I have, so $4 and change is pretty good for this project!


Take a look-see at that finished project one more time!

I'll be linking up to "Free For All" at Young & Crafty. Man, there's some fun stuff there! I'm not sure I'll get all my unfinished projects done before I start on something inspired by the cool things at that link party!

Saturday, October 1, 2011

Spiritual & Creative Edification

Today I made this:
googly eye frame
and this:

kid's art folder (BonnieBlue's real name photoshopped out; it looks cuter without that blob)

I spent probably 4 hours crafting today while listening to General Conference (General Conference is a twice-a-year broadcast over an entire weekend during which the leaders of our church--both men and women--give talks on gospel topics). General Conference is one of the most spiritually edifying experiences I have the privilege of witnessing, and today I got to add the creative edification of making not one, but 2, projects that have been on my list! Woot!

I would have worked on my Little Forest Quilt-Along project, but I can't really hear over the sewing machine. By the way, does anyone know of a quiet sewing machine because my sewing room is right next to BonnieBlue's bedroom so I can't sew after she goes to bed. Not cool.

Sew anyway, the googly-eyed frame was inspired by this most excellent frame made by the blogger at A Diamond in the Stuff.


My source of inspiration, from http://adiamondinthestuff.blogspot.com/.

A couple of things. First, I do not have the patience and/or the attention to detail that this woman has! Second, I don't have the time or talent, either. Also, though I LOVE this, I was wondering how a similar project would work with the 'less-is-more' philosophy in practice. So I tried and came up with the cute frame you see in the beginning of the post.

Here's how I made the googly-eye frame. I don't have pictures because it's not complicated. The best part? Cost me $3.50. The frame was on sale at Target for $1.48. It was already black. Target also had a packet of googly eyes of different colors (green, orange, purple), as well as white, and 3 different sizes for $1.99. Lots of googly eyes came in the package; I didn't use them all. I already had the teeny-tiny ones, and I already had the glue. I carefully arranged and glued on the googly eyes. BonnieBlue helped a little, but she was way sloppy with the glue and it showed, so I lured her away with a coloring page and markers. Ta-da! (sorry about the flash; I totally blow at taking pics)

I am planning on putting a picture of BonnieBlue in her last-year's halloween costume and then change it out every year, placing the new one in before I put it away for the season. Wouldn't that be pro-active?

Next post will be a detailed tute for a kid's art folder. BonnieBlue started pre-k this year and is bringing home scads of papers, including pictures she draws. I can't/won't keep it all, but I do want to keep some because they're just so stinkin' cute. So I happened upon a great idea and made it better! Stay tuned!

Tuesday, September 20, 2011

Little Forest Quilt-Along Update

I'm just a tad behind on the Little Forest Quilt-Along...I've got all the trees sewn but don't have the trunks on yet. After that, I have to sew them all together in rows with the 'blank' blocks and then sew the rows together. My classes are starting tomorrow(!) so I've been busily trying to catch up with my course prep and so haven't been working on the trees.

But, given that Mama Pea is my quilting mentors, I've been following her lead and I've started another project! I know, right! What am I thinking?

Here are the fabrics:

I was blog hopping the other night (I remember when the phrase I used to use was "I was bar hopping the other night") and found an adorable quick little project for Halloween. Problem is, I can't remember where I saw it. (Interestingly, memory problems were also an issue when I was a bar hopper.) It is so easy, I don't need to go back to it, but I would like to give the gal credit, so I'll try to find it before I finish the project.

Friday, September 16, 2011

Progressing on the Little Forest Quilt

I love that Stephanie (Little Forest Quilt Along hostess) is not only giving us deadlines but she is also having give-aways for meeting them! And, there is not much time between deadlines, which means this is a rapid-fire-get-it-done project! It's totally keeping me engaged.

Here's what I have so far.

Here's a close-up of two blocks.


And here's a reminder of the inspiration for the project, the model.


Mine won't look nearly as crisp and modern because I'm using darker green for the trees, maroon for the trunks, and off-white for the background. And I'll have almost no variation in the shades, at least not at this point.

I've got half my trees pieced (unless I decide my hanging looks sparse, and I make more), so I'm on track. Our assignment for this week is to piece the rest of the trees, and then sew them into rows, and then sew the rows together. Essentially, we're supposed to finish the top. I'd like to keep sewing tonight, but BonnieBlue and Rhett are both sleeping and my machine is too loud (and right next to their rooms) so I can't. :-(

Wednesday, September 14, 2011

Goodies in the Mail & Little Forest Quilt Along

Last week, Alamosa Quilter informed me that I won her first give away! I found Alamosa Quilter via my friend, Mama Pea, and her blog. Alamosa Quilter is also participating in the Little Forest Quilt Along that I'm enjoying.

I was expecting the delivery of my 'win' to be a "squishy package" (what Mama Pea calls packages that have fabric or other items she won or ordered or are a part of her design team projects), so I wasn't even excited when I got the smallish box and opened it, thinking it would my new phone cover/case I had just ordered. Much to my delight, I pulled out this!


This is a beautiful knitted pot holder or mug rug. Why oh why does it have to be so pretty! I'm not going to want to use it because I'm not going to want to get anything on it! It actually will come in handy. I drink tall cups of ice water while I'm crafting, so this will be nice to sit the cup on to catch the sweat.

Here, though, is what came in that package that really tripped my trigger!


A pin cushion thread catcher made with the most beautiful fabrics of the most beautiful shade of blue EVER! Wow.  It's wrinkled in the pic so it doesn't look nearly as good here as I see it in real life hanging from my craft table.

I.
Love.
It.

Thank you, Alamosa Quilter Lynn! You rock! This was my first blog give away win; hopefully, it won't be my last, but if it is - well worth it!

In Little Forest Quilt Along news, I've finished cutting the trees. I almost forgot about the "blank" blocks I need. I will have to do those another day. But here are my trees waiting to be pieced.


I have to sew half the trees to be on track for this week. I was going to do that tonight, but I'm beat. It looks like it might be tedious, but I'm grateful to Mama Pea who posted a video tutorial of the process here. This is the only way I'll be able to do it right the first time. I have enough cut out to make 16 trees so I have to sew 8 of them. I haven't sketched out my design yet (and really wasn't planning to), but if there aren't enough, I was thinking I might add something to the other blocks. If I do it, it will be a surprise so I won't say what now, but it could be really cute if I can pull it off.

And because one of my readers only peruses for pictures of Bonnie Blue, here is one from before vacation - specifically before I cut her hair. I'll blog about that another day, but isn't she just all full of vim and vigor here?! Cracks me up.

Friday, September 9, 2011

I won Alamosa Quilter's 1st give-away!

Lynn over at Alamosa Quilter decided to have a give-away series to celebrate  her 500th post - what a great idea! And I won! Go here to see what I won (I will post a picture of it when it arrives).

Her first give-away was embedded in a post about a friend I first met in August of 2002 and with whom I recently reconnected via blogging. That friend is Stephanie, aka Mama Pea at Peas in a Pod. Mama Pea was in fact my inspiration for beginning a blog, which fortunately has been relatively self-sustaining as fewer than 4 people read my blog (that I know of).

So anyhoo, I was reading the post about Stephanie and the give-away, and decided to enter only because I had something to say about Stephanie (one of THE nicest people you'd ever want to me; I aspire to that level of niceness!). So in a way, I have Stephanie to thank for winning. But of course, more importantly, THANK YOU, LYNN!

I won a really cute pin cushion-thread catcher. I am so new at sewing that I have almost nothing like this. No, I don't even have a pin cushion. The fact that it's handmade by someone as talented as Lynn will surely inspire me to finish my newest project, The Little Forest Quilt Along. I'm going to get started on cutting as soon as I unpack from vacation!

It's really interesting, this blogging thing, especially the quilting blogging thing. I follow (officially and unofficially) a few non-quilting, non-crafting blogs. Crafty ones have absoluletly lovely commenters whereas other blogs seem to have trolls who hang out with the implicit purpose of raking the blogger over the coals. I've read such incredibly mean comments! But you never, EVER read anything remotely mean from commenters on the quilting blogs. Quilting Bloggers and their readers are so incredibly supportive that reading their blogs and comments are like reading what a mother would say to her daughter to encourage her! It's a perfectly lovely respite from the ugliness of the world and especially the ugliness of the rest of the blogging world. So, to all you quilting bloggers (and readers) out there - You rock!

Wednesday, September 7, 2011

Emerald Isle

We've been in NC at Emerald Isle for our annual beach vacation. It's been great to be able to come just after "high season" at the beach: over Labor Day weekend and week. But next year, BonnieBlue will be starting Kindergarten and OSU will be starting a semester calendar, so we'll both be in school earlier in the year, making a Labor Day vacation unlikely. Cost for these beachfront locations are quite high during the summer months, so unless we find a family to share with, we won't be back for awhile. I am kinda' thinking that maybe Disney World next year might be an option instead.

Here's where we stayed both this year and last.
We're on the 3rd floor on the right.

Here's the view from the dining room. Nice!


It's a great little condo development, with two pools, which came in handy this year because the surf was a bit choppy as Hurricane Irene headed out and Hurricane Katia headed in. In the photo below, our building is the one all the way to the right, closest to the beach. That's Bogue Sound on the other side. EI is quite the narrow island, right?


I love the beach, and the ocean. Being here recharges me. There is absolutely nothing like the starry sky on a clear night at the beach. Breathtaking.

BonnieBlue had a ton of fun. The only thing missing is someone her age to play with. We desperately want to find a family with a girl her age to come to the beach with us.

Sunday, we had our friend (Aunt Reesie) and my work colleague over for dinner. Her family has a beachfront cottage here on EI that has been in their family since the middle of the century. She spends several weeks every summer here, and our visit usually overlaps with her stay. BonnieBlue took this pic.


We always stop at Willis' fish market for Vesta's homemade key lime pie and fresh shrimp and scallops. Next door is this gift shop.


We take quite a few day trips when we're in NC. On Saturday we went to Cape Lookout National Seashore. BonnieBlue is too little to go up in the lighthouse yet. Maybe next time!
On Sunday, we went to Harker's Island for sacrament meeting. Harker's Island has a strong Mormon heritage and current population. Russ drove out there last year (approx. 40 min drive) when we were here and met Mattie at the Core Sound Museum, and when she found out he was Mormon, she gave him a book called, Strengthened By the Storm: The Coming of the Mormons to Harker's Island. I'm reading it now while I'm here. Wonderful story! I love that there is a turn-of-the-century "pioneer" heritage here on the East Coast, as I find it hard to relate to the westward trek stories that saturate the LDS history and culture.

Today, our last day, is rainy as Hurricane Katia moves closer in. She is supposed to skirt landfall, but we've gotten quite a lot of rain this morning just the same. As I type, it looks as if it might clear up for a little while.

Tomorrow we'll drive all day (12 hours!) to make it back home. I am already missing the beach. Sigh.